Monday, January 23, 2012

Kiss My Face!

Every Christmas, birthday and other assorted times throughout the year, Mr. Vagabond's mom, my mother in law, sends packages full of goodies. She is all about everything natural, so most of the things we receive are good for us. This lady takes goodies to a whole new level. I'm not talking a few little things. I mean packages and boxes and bags full of really neato stuff!


This Christmas was no different. Among the numerous pretty things she gave me, I found a big ol' chunky bar of soap. Kiss My Face soap, to be exact. 


Deeeelightful!


This isn't just your everyday bar of soap. It's gigantic! And heavy, too. Having never used Kiss My Face products before, and considering the size of this soap, I figured it was for the bath only.


Then I read the label:


  • Saponified olive oil
  • Water
  • Sodium Chloride


That's it, and that's all. 


You might wonder what "saponified olive oil" is. It's olive oil that has been magically converted into soap by adding it to a mixture of water and lye. Don't freak out on me yet. Although lye is the stuff used to clean drains, it's an alkali that is mandatory for making soap. Oils don't "soap" without alkali. The process goes a little something like this:


  • Mix the lye with cold water
  • Add in the oil
  • Stir it and mess with it and add any other ingredients you like, such as salt (sodium chloride) in this case, until it's all nice and blended.
  • Voila!  Soap!  


If you read the labels on "soap" in your bathroom you might not see saponified anything or the word lye in the ingredients.  Wanna know why? The vast majority of what we casually call "soap" is actually... detergent


EEK!


Yes, friends and neighbors, many of us unwittingly lather up our faces and bodies with detergent every single day. The most common, name brand, sweet- or fresh-smelling bars are detergent. Not just the deodorant "soaps" either. Even the bars of pink stuff that is marketed as good for our skin, moisturizing and so on and so forth. Detergent. 


Soap is about as simple a product as can be. Three ingredients are all that's necessary. You may have heard tales about "Grandma's lye soap" which legend always says could take the hide right off you. Although that's not off the mark, it's also not 100% accurate. 


The difference between strong lye soap and other soaps, like Kiss My Face, is the blend. There is an art to soapmaking. Sure, you can mix the three in the right order and come out with something that will get you clean. The art happens with the process, blends, types of oils used and other secrets that expert soapmakers  guard like Aunt Sue's homemade pumpkin pie recipe. I'm no expert, but I have made my share of soap.


After using Kiss My Face soap in the bath for a couple days, I tried it on my face. In winter, my skin is drier than last week's leftover biscuits, and just about as attractive. To really see whether it would work, I had to skip the moisturizer. Several hours later, I forgot I'd even used it. That's a good thing. With that pink bar sitting in a pretty dish on the vanity, I'd be scratching and itching until I applied some kind of moisturizer. 


So now, I carry the big, green bar back and forth between the tub and the vanity every day. I need to buy a smaller one and toss out the pink stuff. 


If you're wondering where the olive green color comes from, it's not an additive. It happens naturally during the soapmaking process. Fats are also mandatory for making soap, and each type of fat turns a unique color when added to the lye and water mixture. Every different oil or fat used for soap will turn orange or green or dark, muddy brown or it will fall somewhere in the middle. Pink is nowhere in the soap spectrum without a special process to prevent the darkening and then adding color. Goat's milk soap turns orange. Olive oil soap turns brownish green, like the image above. 


If you're in the market for something lovely and new, I can highly recommend Kiss My Face olive oil soap. My skin is extremely sensitive, but this stuff is like magic! No dyes, no perfumes -- just plain soap. 


XO

Photobucket

Wednesday, January 18, 2012

(Mis)adventures in Kitchen Renovations


Welcome to another episode of 
Love My House
Ok, that was worse than corny. Maybe I should make my own intro. Something like this, perhaps? 

About five years ago, Mr. Vagabond and I set out on this mad ride to restore an 1890s folk Victorian farmhouse back to its former glory. Along the way, we learned that some of the job could never be a restoration. Unless, of course, we wanted to convert the kitchen and lower bath back into a porch. Probably not the best idea, since bathing outside could send the wrong signal to the neighbors. We dove in headlong as soon as the sale was final. 

Then came the fun part: finding out just what we’d gotten ourselves into. 
I have thousands upon thousands of images showing firsthand the joys and miseries of those first months. Most of them are for another day. Today, we’ll talk kitchen.
This is how the kitchen looked when we bought the house. Try not to be too envious. 

Ewwww.
Knowing my love of old houses, and seeing my handiwork firsthand in many of our former landlady’s rentals that we’d occupied, Mr. Vagabond trusted that I could wave my magic wand and turn this frog into a princess. He had hope. Ahh, those were the days. 

The Level is Your Friend

One of the first things we confirmed with a handy 4' level was that the kitchen floor sloped enough to host a box car race. 
And this is why:
No words. Just stand in silence while the situation sinks in.
As Bob Vila recently commented, what’s hidden inside an old house is often one of the best, and scariest, things in the world. I think this rotted corner pretty much confirms that. The siding left no clue to what was lurking underneath. We later learned that we should have looked up to figure out what caused the rot. The gutters were a disaster. The water flowed down that side of the house for who knows how long. I would say that we should have sued our inspector, but I do still love this house. Plus, this little train wreck was repaired before we did anything else. But that’s a story for another day.  
Back to the Kitchen
As soon as the structure and foundation were sound and level again, we gutted the kitchen. Don’t be afraid. Demo is really, really fun!

It was a bit dusty that day


I’m sure our neighbors kept the liquor store busy while we kept adding to this pile out back.
Yay!  Junk!
Luckily, our wonderful city workers tool around looking for such things. They loaded it up and hauled it off in a nifty dump truck for free! If you don’t have such services in your area, it’s wise to consider a demo dumpster. Seriously. 

On With the Kitchen
Although a period-correct 1890s kitchen wouldn’t really be something many of us could truly live with, I had a vision. I wanted everything to be free-standing and pleasantly mismatched. Mr. Vagabond and I have built enough storage cabinets to fashion lovely things for the kitchen. I wanted a long cabinet on legs for the sink base, some kind of armoire-looking thing for the pantry, open shelving for the dishes and I hoped to score (or build) a hefty table to stand as an island. 
Nothing ever goes as planned; I didn’t get the kitchen of my dreams. The interior design office where I worked at the time was closing down, and my boss was writing off warehouse items as if her life depended on it. She asked if I could use a bunch of cherry cabinets. How could I say no? They were new, after all, and I love cherry.
Sadly, the cabinets were ultra-contemporary. Oh, well. There’s a work-around for everything, right? 
Because we needed kitchen storage after ripping out the nasty old ratty cabinets, and because we didn’t have the funds for a new floor just yet, we did something rather dumb and smart all rolled into one. We installed the floor around the perimeter of the room and set the new cabinets on top. 
For a while, we lived like this. Again, try to control your envy.
Admit it. You want this kitchen.
With no upper cabinets, everything sat on top of the base cabinets. 
Don’t Try This At Home, Kids!

I have no idea whether this is cool or not, but we laid foam board under the flooring in the kitchen. A quick assessment of what they jokingly called a crawlspace showed us firsthand that there was no way to install insulation under the floor. Unless, of course, I could hire a three-year-old to do the job. Last I heard, there are labor laws against such things, so we were left to our own wits once again. East Tennessee gets gullywashers of rain and the ground can stay soggy for weeks. Five years later, we have no moisture issues and the floor is still sound. I guess it’s ok. 

Aside (I do this a lot)
In an interesting turn of events, someone broke into our house during the kitchen reno. See that pretty Dewalt drill on the left counter? Whoever came in made off with it and the Rotozip that I used to trim the bathroom tiles. He also took my bottle of Crown Royal, that dirty dog. He then went on to the detached garage, where he went “shopping” on and around Mr. Vagabond’s Jeep. You can take a drill and a Rotozip. But when you mess with the ol’ man’s Jeep, them’s fightin’ words!

Back to the Kitchen
After I came to terms with the fact that I would not have my freestanding cabinets, I decided to install some simple, clean-looking tile. Four-inch white tiles, to be exact. 
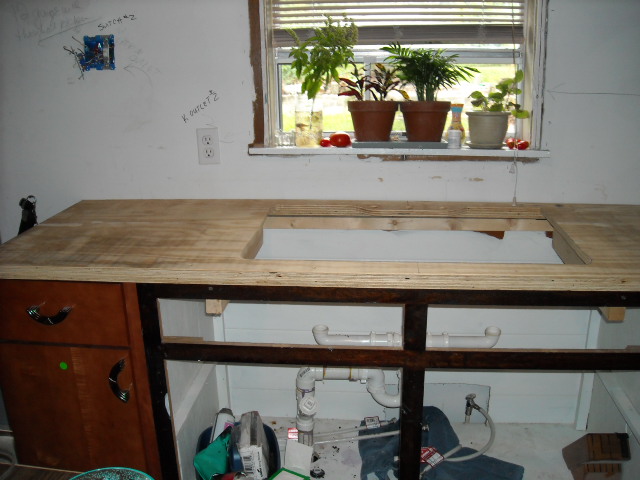
The first thing on the agenda for tiles is building the countertop. We used 3/4-inch plywood. When building a countertop from plywood, it’s important to place a supporting brace on the underside at the location of every joint between base cabinets. The plywood is not thick enough to fabricate a countertop as a single layer; the braces raise it to the correct thickness while adding strength at the cabinet seams. We framed out the perimeter of the bottom with ripped sections of plywood to build it up and fastened braces from the same plywood at every cabinet joint. A table saw is the best tool for ripping plywood, in my opinion, but you can do it with a circular saw if you have a steady hand.
After the countertop was complete, we cut the opening for the sink and tested the fit.
Mr. Vagabond's sexy hand.  Swit Swoo!

It might not look like much, but that cast iron sink is one of my favorite finds. I unearthed it at the Habitat for Humanity thrift store in Oak Ridge for $20. I let Mr. Vagabond do the lifting and hauling part. I shop and work, and he buys and does most of the heavy lifting. He’s cool like that. Due to the sheer heft of this style of sink, we added additional braces under the countertop to help bear and distribute the weight across the row of cabinets. 

Then we installed the counter. 

Did I mention that the level is your friend? It is. Trust me.
Installed countertop

(Really, you should stop drooling over my kitchen. It’s unseemly.)
Remember when I mentioned that stuff rarely goes as planned. Remember those cute little 4” tiles I wanted? This is what I got.
Black granite was NOT my first choice.

Don’t worry. The Liquid Nails was not on the counter for tile installation. This photo was of a dry fit for the tiles. Who knows why the Liquid Nails was out. 
Anyway, yes, friends and neighbors, I got black granite instead of the cute little white tiles that I wanted. I am probably the only person in the world who thinks, “Dang. I can’t have ceramic, so I’ll have to just settle for granite.” No one ever said I was normal.

Aside (Told you I do this a lot)
The back story on the tile is that on a quick trip to Lowe’s, I discovered a pallet of black granite 12” tiles on sale. I tried not to look. I really did. But I knew Mr. Vagabond wanted granite. He’d only resigned himself to the white ceramic because I’m the one who would install it, and he is the one who would pay for it. That’s kinda how things go around here. I called him, told him the price, which was stunningly less per sq. ft. than the ceramic, and he jumped for joy. That part is a lie. He rarely “jumps”, and it’s less often that he “joys.” Suffice to say he was happy. I loaded up the cart. For $200, including the cost of thinset and black grout, I tiled my kitchen counters with granite. I had leftover Hardiebackder from the shower, so I didn't need more.

Now tell me, where do you find granite counters for $200?  My house; that's where!
Since I have to rent a wet saw if I need one, and cutting granite requires special bits and blades, I decided I’d work on clever placement and not cut a single tile. This took a bit of plotting, but it worked out. 


I decided to break up some of the leftover slate from the shower and use it as a mosaic around the sink and along the back of the countertop. I later decided against it, and went with wood inserts instead.

And now comes the part I am most proud of in this kitchen.  My island / bar. Because we had so many leftover cabinets, I couldn’t justify spending the cash for a big wood table in the center of the room. It wouldn’t have looked right anyhow, since the kitchen’s theme had turned a dizzyingly-fast  180. While Mr. Vagabond was working somewhere in Kentucky, I built this all by my own little self. 
Words can't explain how I love this thing.


The bottom is two base cabinets fastened together. I fabricated a countertop for it like the ones we made for the rest of the cabinets. The back side is where it got interesting. I wanted an area where we could sit and take casual meals. I built up the back and installed triangular supports for the bar top. Do the legs look like anything you know? They’re 4x4 fence posts turned upside down. My brain is always working overtime with regard to unusual applications for everyday things. 

I added a little wood flourish and stained it to match the cabinets. Because I couldn’t cut the granite, I used a 1x4 for the island backsplash. Painted black, it blends. 
Now comes the really fun part (I know I keep saying that)
Because we didn’t order these cabinets, we had to work with what we had. Ordering cabinets means that they will fit the dimensions of your room. We didn’t have that luxury. 
But I am nothing if not resourceful. 
Unfortunately, we could not make the upper cabinet configuration work in the the corner no matter what we did. Doors collided, gaps appeared and we said a lot of bad words (sorry,Mom). That lasted most of the weekend. We went through a lot of tequila in the process.
That Sunday night, I asked Mr. Vagabond to build me a platform in the corner that was the same size as one particular upper cabinet. He looked at me suspiciously, but that’s nothing new. He does that a lot. 
I later learned that when he left for yet another in his lifelong series of road trips, he just knew he’d come home to something out of a Dr. Seuss nightmare. 
Instead, he came home to this.
Yeah, he was surprised, too. I hate that little door at the bread cubby in the corner. I was not prepared for the density of the cherry, and my cuts went haywire. I built and hung the little door as a temporary solution. 

Finally!
As you can see, my kitchen has come a long way. A slight miscalculation when buying the slate for the shower led to a lot of excess, which I turned into the kitchen backsplash and a tall panel behind the stove. 

One of these things is not like the others...

In a fit of defiance over the modern cherry, I kept the original sink cabinet and built new doors for it. Off-white paint made it stand out even more. Some folks like it, others think it looks wonky. I love it, and think it breaks up the too-clean, modern lines of other cabinets. I still need new knobs and pulls, but the ones I want are going to cost a small fortune. 

Sinner, gazing at her pretty self in the shiny, black plank floor.


After realizing the slate mosaic around the sink was a really bad idea, I installed strips of pine and stained them to complement the cabinets. I sealed the daylights out of it with silicone, and there have been no problems after several years of heavy abuse. 


This is the corner of the kitchen that leads to a bath and the living room. The cubby exists where the old doorway was. I moved it. I do things like that. 

Whatever you do, remember that it is your kitchen. No one has to like it but you! As long as the materials and installation are up to code, let your freak flag fly and make it however you want it to be. 
This house is an ongoing project. We never pay full price for anything except tools, and those are worth it. Never, ever, ever buy a knock-off tool because it’s cheaper. You’ll thank yourself a thousand times over the years for forking over the dough for the right tool for the job. 
In the book I am writing, I have devoted an entire chapter to selecting the right tools. Don’t let me catch you buying one of those matchy-matchy pink hand tool sets. They’re designed to break upon first use, and have no business in your tool box. Trust me on this. The right tools are a worthy investment. 
Patience is really important for living the way we do and renovating on a meager budget. We (meaning I) only installed a real floor in the living room last month, and we’ve been here five years! Until then, it was plywood painted white. That was a nightmare to clean, lemme tell ya. But as this blog goes, that’s another story for another day. 
Be well, be happy and be thankful.
XO


Photobucket

Monday, January 16, 2012

Motivational Monday - Procrastination, the Ultimate Self-Soothing Mechanism


We all know at least one person at each end of the productivity scale -- the consistently productive and the perpetually scattered. Daphne Dammitall is perpetually scattered.

I am not.

Consistently productive people may seem to average folks like they are super-charged on caffeine. Maybe they are just naturally focused. Perhaps their minds are models of efficiency with each minute of the day color-coded and arranged somewhere in their gray matter in a kink-free tickler file system that is updated hourly. 
That’s probably not the case.
Perpetually scattered people might appear to be a wellspring of excuses (to themselves and those who depend on them). Maybe their desks are covered with empty coffee cups, chewing gum wrappers and bills from three months prior. Their brains might contain the answers to a million riddles, but the filing system is a shoe box packed with three years worth of old receipts dumped out onto the accountant’s desk. 
That’s probably not the case, either.
Nearly everyone procrastinates about something. Even the most organized person probably puts off some task until the very last minute. The difference between each end of the scale is when she procrastinates and why. 
Procrastination can be one of deepest-rooted methods of self-soothing. I don’t like this, therefore I won’t do it... yet. I will do it, just not now. If I put it off, I can’t fail right now. If I wait until my thoughts are more organized, the result will be better. I absolutely loathe this task, and not doing it makes me feel better in the here and now. And if I don’t do that thing I hate, think how much better I feel! 
Unfortunately, that kind of self-soothing doesn’t last. In fact, it procrastination can multiply so fast that it ultimately takes over. Things that are usually pleasurable can become unbearable to even think about because we know that if we indulge in them, the rest of the hurdles are still mounting higher and higher. After a while, exhaustion can set in, and then we’re really in trouble. 
It's Monday -- ALREADY?

Why do some people procrastinate, even with things that aren’t physically or mentally difficult?  
Psychology Today suggests that there are three main reasons why people procrastinate. If you struggle with this problem, you might see a bit of yourself in one of these. I know I do. I am a weapons-grade procrastinator.


  • We just don’t wanna do it. It’s icky or painful or depressing or overwhelming or for whatever reason, quite unpleasant to think about. 

  • It’s boring. We know it needs to be done, but for the love of Mike, I think my brain might fall out my ear if I have to succumb to even a minute of that mind-numbing THING, whatever it is.

  • We’re easily distracted. Although parts of me fit into the other categories, I fall flat on my face in the middle of this one. I am basically a ferret. If it sparkles, I am all over it like wrinkle cream on a “Cougar.” The phone rings, there’s a knock at the door, the dogs bark to go out, the dryer buzzes or, that phenom of life suckers, Facebook beckons me to check.  Just for a second. 
WIth all of these categories, one thing is clear:  If I don’t do it now, I'm sure I'll feel like it or get around to it or have the internal fortitude to make myself do it tomorrow


I would like to add another to the list:  Fear of failure. No, I am not afraid that I will fail if I do the dishes now. But I sure don't wanna blow what will probably be my only shot with an agent. If I don't finish, I won't fail because I can't query and tomorrow saves the day again.


The infernal tomorrow. At this very moment, I am procrastinating over three deadlines. They’re not difficult and I’ve not been distracted. They’re just plain bo-ring. ZZZzzzzzz  Sure, I’ll complete them on time. But I’d sure like to know what it’s like to have the peace of mind that accompanies getting them done early! 
So now that we’ve got three (four?) tidy boxes in which to place ourselves, what next? Surely, since head shrinkers get together at their head shrinker gatherings and discuss all things head shrinker-ish, they must have found some light at the end of the tunnel and a reasonably uncomplicated map showing us how to get there.  
Psychology Today goes on to offer a few weapons against putting things off to the point where it’s overwhelming. Light and a map. Cool.


  • The first, and of course this one is easier said than done, is to just get going, already, and do it. A body in motion tends to stay in motion. If you start the task, you’ll more than likely complete it -- eventually. Maybe even today! I use this method often. The way it works for me is that I will sometimes literally close my eyes and just START. Once I’m moving, I keep after it until it’s done, or until I collapse in exhaustion or depression or longing for a cupcake. At least I get something done, and my day isn’t a total loss when force myself to begin.

  • Look the demon in the face and call it a drooling, spitting, smelly old demon. Or something else. You can make up a name if you like. If your demon is obsessively checking your email, shut it down. You can do that, you know. Really. Supposedly, every single one of us will have unread email in our inboxes when we die. If Facebook or Twitter are the time sinks, just don’t go there!  What a concept. I might try this one tomorrow. Maybe. We’ll see. I already have separation anxiety, and it's not even tomorrow yet. *bites nails*

  • Don’t try to do a 180 overnight. You might sprain your ankle, and then you’ll be in even worse shape than you are now. You’ll also look kinda funny hobbling around. Take baby steps. If your ultimate goal is to finish writing one chapter this week, start with manageable goals inside that larger one and work your way up. Maybe it’s 2,000 words today. And another 2,000 tomorrow. My goal this week is to finish a certain book proposal that I have been putting off for about three months (shush, Stacey. I'm working on it. Really. I swear!).  Why on earth I haven’t done it yet is beyond me. Well, maybe it’s a little way up the page in one of those categories. Heh. 
Wherever you happen to be in the land of procrastination, there’s always a way up and out. Tomorrow really is a good day, and you can transform yourself into whoever you want to be. That, my friend, is within your power. You might not be capable of writing yourself a big bonus check, but you’ll probably sleep better at night and wake in a better mood. 
If you have methods for beating procrastination, I would love to hear them. 


Photobucket


Read more about procrastination -- what it really is, and how to get a handle on it --  at Psychology Today


Daphne Dammitall is created exclusively for Irrational Propensity by Daniel Cox, artist extraordinaire. View more of his work at Deviantart

_______

All text and Daphne Dammitall images are copyright © Irrational Propensity 2012

Thursday, January 12, 2012

Bathroom Renovation - Things I Love

Besides writing, my greatest joy in life is renovating what needs it and restoring what is possible in my 121 year old folk Victorian house. In its lifetime, this lady has seen hundreds of remuddling attempts. I'm surprised she hadn't barred her own doors before we found her. Set on an acre of east Tennessee land, this house embodies my love, my hate, my triumphs, my failures, my busted knuckles and most of my bad words. 

Renovating and restoring old houses is in my blood. When I see an old house in need of a hug, all in the world I want to do is run up and give it one. I made a promise to myself and to this house that one day -- one lovely day, she will stand with the grace and beauty she once had. 

Not beautiful yet, but she will be
This is how she looked the day we bought her. Awful siding that we later discovered was covering cedar shiplap siding (among other things), rickety hand-crafted homemade porch balusters and railing, metal front door masquerading as something much prettier than it actually is, and a host of other things make up this house that I love. We will pretend that those shutters and aluminum screens aren't there since they aren't anymore. I ripped them off last year.


The first thing I wanted inside this house of mine was a bathroom that didn't make me scream and run off in terror each time I walked in. Here are a few images of what we were dealing with:

Water heater and washer / dryer connections just inside the busted Luan door.

With the existing configuration, I could get my daily workout over and done before I made it all the way into the bathroom each morning by climbing over the washer and dryer. In other words, it had to go. The water heater was also in a stupid place, if you ask me. 


Waterslide, anyone?
Now, I have absolutely no idea what the previous owners were trying to accomplish here. Is it a waterslide? Is it a headrest? What is it? I just don't know. We ripped it out. 


Unfortunately, this situation had to stay. 
Without the funds or inclination to replace the bathtub, and considering that it was in ok enough shape, we kept the enamel bathtub. We also kept the toilet, since it was relatively new. It's not my ideal bathroom stuff, but we had too many other things to worry about without tackling things that didn't require it. 


Phase one of the reconfiguration

After ripping out the combination Headrest / Waterslide of Doom, Mr. Vagabond and I built a wall at the end of the tub. I added 2-by-2 cleats for shelves, and called it (temporarily) beautiful. This image is the middle of the Hardiebacker installation. 

I wanted a ledge on the front of the tub. I am a soaker. I love my baths. A ledge meant that I could set candles along the edge and still have room for a book and a glass of wine. I framed out the front of the tub with 2-by-4s, similar to the way you'd frame and raise a wall. Because I am a splashy bather, I used a ton of silicone under the Hardiebacker along the top edge of the tub instead of hoping thin-set would do the trick. Five years later, and it's still holding beautifully. Because I was not blessed with length of leg, I stand on that ledge to change the shower curtain. 


I made it myself!
This door is something I love. Because the bath is rather narrow, it's difficult to get a shot that shows some perspective. But if you look at the left lower edge of the photo, you can see part of the toilet (you're welcome). 

Because we had to move the water heater, we also had to find it a new home. That home was on the right side of the toilet. I framed up a wall on the left side, making a closet that separated it from the toilet, and then I built this beautiful door!  Did I mention that I am proud of the door? I am. Lots. It's nothing but simple tongue-and-groove beadboard mounted on 3/4-inch plywood and 1-by-4s for molding.  This closet only houses the water heater, and I am on my own with most improvements around here, so I used a sliding bar-style lock. It doesn't really need a knob. How often to you need to access your water heater? That's what I thought. The hinges are plain gate hinges. I thought they were cool. 

The door was eventually painted a creamy off-white to match the rest of the trim in this room.


Rotozip Love
Next came the tile for the shower. I learned to love my Rotozip that day. A wet saw is almost mandatory for a large project, but the dimensions of this shower meant that I had very few cuts. I opted to only use my Rotozip diamond attachments. 

Ugly shoes!
The diamond bit is indispensable for making precision round cuts. The plumbing needed openings, and this little thing did a beautiful job.

Don't worry - the Hardiebacker was re-hung without the gap before I installed the tile. 
See what an awesome job that little tool did on the openings? This is why I love it. Without the Rotozip, I would have cut away a square for the plumbing, and then patched in a small section on the right side. This way, the tiles remained intact, with no ugly joints.

Nice, thin cuts!
The diamond blade on the circular saw attachment made light work of trimming off thin slices of tiles in the few places where I needed it. I made one steady pass across the tile to create a groove, which enabled me to go back and cut the tile cleanly and without worrying over potential chips on the surface.

I love this tile!

After all the cutting and pre-fitting, it started to take shape. 

Oooh Pretty

I used a trick that I learned from my former landlady to achieve the narrow grout lines. Instead of tile spacers, I used pennies slid in on-edge between the tiles. Pennies are uniform, and they're easy to pull out once the thinset is dry. Pennies create a narrower grout joint than spacers, and I prefer a narrow joint in bathrooms. 

One word of caution about pennies. If you leave them in place too long, they will start to oxidize. If your tiles are porous, you may be stuck with green stains embedded in the tiles. Always pull them out as soon as the thinset is dry.


How I love my bathroom
If you're wondering what became of the corner where the water heater and washer/dryer connections used to live, this is it. The vanity was once a dresser that belonged to my niece. I reconfigured the innards to make room for the plumbing and removed all the drawers. I shortened two of them and reinstalled them on the right. The top drawer face was fastened back to the vanity as a dummy plate, and then I built a door to access under-counter storage. The last part of converting the dresser into a vanity was cutting the opening for the basin. 

I didn't want too much of the dark slate in one room since we have a black wood floor, so I tiled the vanity top with pale dove gray 4-inch ceramic tiles and accented them with tan bar tiles. I added a single row of the same decorative, metallic gray tiles that I used in the shower across the top of the backsplash to tie them together. 

I am proud of this little vanity thing that I created. I found the basin at Habitat for Humanity's thrift store in Knoxville for $10. It was practically new.  

Unfortunately, or fortunately, there was a real problem when it came to installing the faucet. There was no room!  I kitty-wopped it at the back left corner, which I think turned out kinda cute. If nothing else, it's different. Mr. Vagabond isn't a fan, since his hands are a lot bigger than mine. The faucet works fine for me, but I will likely need a new style so he can get his man hands under it. 

The other cabinet in this image is an old filing cabinet that I put on casters. The drawers face right, and it houses all those silly little bathroom things.

The finishing touch was the print of Bougereau's Pan and the Water Nymphs. My boys used to look at it and say, "EW!  Girl butt!" They grew out of that. 

My bathroom is nowhere near complete, but it is certainly livable now. Each week, I'll bring a bit of my renovation and restoration insanity into your world. If nothing else, it might serve to make you feel a bit better about your home and hearth! 


XO