
Welcome to another episode of
Love My House
Ok, that was worse than corny. Maybe I should make my own intro. Something like this, perhaps?
About five years ago, Mr. Vagabond and I set out on this mad ride to restore an 1890s folk Victorian farmhouse back to its former glory. Along the way, we learned that some of the job could never be a restoration. Unless, of course, we wanted to convert the kitchen and lower bath back into a porch. Probably not the best idea, since bathing outside could send the wrong signal to the neighbors. We dove in headlong as soon as the sale was final.
Then came the fun part: finding out just what we’d gotten ourselves into.
I have thousands upon thousands of images showing firsthand the joys and miseries of those first months. Most of them are for another day. Today, we’ll talk kitchen.
This is how the kitchen looked when we bought the house. Try not to be too envious.

 |
| Ewwww. |
Knowing my love of old houses, and seeing my handiwork firsthand in many of our former landlady’s rentals that we’d occupied, Mr. Vagabond trusted that I could wave my magic wand and turn this frog into a princess. He had hope. Ahh, those were the days.
The Level is Your Friend
One of the first things we confirmed with a handy 4' level was that the kitchen floor sloped enough to host a box car race.
And this is why:
 |
| No words. Just stand in silence while the situation sinks in. |
As Bob Vila recently commented, what’s hidden inside an old house is often one of the best, and scariest, things in the world. I think this rotted corner pretty much confirms that. The siding left no clue to what was lurking underneath. We later learned that we should have looked up to figure out what caused the rot. The gutters were a disaster. The water flowed down that side of the house for who knows how long. I would say that we should have sued our inspector, but I do still love this house. Plus, this little train wreck was repaired before we did anything else. But that’s a story for another day.
Back to the Kitchen
As soon as the structure and foundation were sound and level again, we gutted the kitchen. Don’t be afraid. Demo is really, really fun!
 |
| It was a bit dusty that day |
I’m sure our neighbors kept the liquor store busy while we kept adding to this pile out back.
 |
| Yay! Junk! |
Luckily, our wonderful city workers tool around looking for such things. They loaded it up and hauled it off in a nifty dump truck for free! If you don’t have such services in your area, it’s wise to consider a demo dumpster. Seriously.
On With the Kitchen
Although a period-correct 1890s kitchen wouldn’t really be something many of us could truly live with, I had a vision. I wanted everything to be free-standing and pleasantly mismatched. Mr. Vagabond and I have built enough storage cabinets to fashion lovely things for the kitchen. I wanted a long cabinet on legs for the sink base, some kind of armoire-looking thing for the pantry, open shelving for the dishes and I hoped to score (or build) a hefty table to stand as an island.
Nothing ever goes as planned; I didn’t get the kitchen of my dreams. The interior design office where I worked at the time was closing down, and my boss was writing off warehouse items as if her life depended on it. She asked if I could use a bunch of cherry cabinets. How could I say no? They were new, after all, and I love cherry.
Sadly, the cabinets were ultra-contemporary. Oh, well. There’s a work-around for everything, right?
Because we needed kitchen storage after ripping out the nasty old ratty cabinets, and because we didn’t have the funds for a new floor just yet, we did something rather dumb and smart all rolled into one. We installed the floor around the perimeter of the room and set the new cabinets on top.
For a while, we lived like this. Again, try to control your envy.
 |
| Admit it. You want this kitchen. |
With no upper cabinets, everything sat on top of the base cabinets.
Don’t Try This At Home, Kids!
I have no idea whether this is cool or not, but we laid foam board under the flooring in the kitchen. A quick assessment of what they jokingly called a crawlspace showed us firsthand that there was no way to install insulation under the floor. Unless, of course, I could hire a three-year-old to do the job. Last I heard, there are labor laws against such things, so we were left to our own wits once again. East Tennessee gets gullywashers of rain and the ground can stay soggy for weeks. Five years later, we have no moisture issues and the floor is still sound. I guess it’s ok.
Aside (I do this a lot)
In an interesting turn of events, someone broke into our house during the kitchen reno. See that pretty Dewalt drill on the left counter? Whoever came in made off with it and the Rotozip that I used to trim the bathroom tiles. He also took my bottle of Crown Royal, that dirty dog. He then went on to the detached garage, where he went “shopping” on and around Mr. Vagabond’s Jeep. You can take a drill and a Rotozip. But when you mess with the ol’ man’s Jeep, them’s fightin’ words!
Back to the Kitchen
After I came to terms with the fact that I would not have my freestanding cabinets, I decided to install some simple, clean-looking tile. Four-inch white tiles, to be exact.
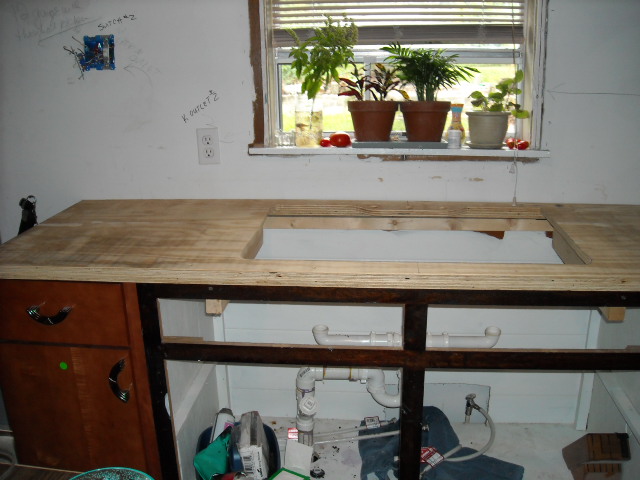
The first thing on the agenda for tiles is building the countertop. We used 3/4-inch plywood. When building a countertop from plywood, it’s important to place a supporting brace on the underside at the location of every joint between base cabinets. The plywood is not thick enough to fabricate a countertop as a single layer; the braces raise it to the correct thickness while adding strength at the cabinet seams. We framed out the perimeter of the bottom with ripped sections of plywood to build it up and fastened braces from the same plywood at every cabinet joint. A table saw is the best tool for ripping plywood, in my opinion, but you can do it with a circular saw if you have a steady hand.
After the countertop was complete, we cut the opening for the sink and tested the fit.
 |
| Mr. Vagabond's sexy hand. Swit Swoo! |
It might not look like much, but that cast iron sink is one of my favorite finds. I unearthed it at the Habitat for Humanity thrift store in Oak Ridge for $20. I let Mr. Vagabond do the lifting and hauling part. I shop and work, and he buys and does most of the heavy lifting. He’s cool like that. Due to the sheer heft of this style of sink, we added additional braces under the countertop to help bear and distribute the weight across the row of cabinets.
Then we installed the counter.
 |
Did I mention that the level is your friend? It is. Trust me.
|
 |
Installed countertop
|
(Really, you should stop drooling over my kitchen. It’s unseemly.)
Remember when I mentioned that stuff rarely goes as planned. Remember those cute little 4” tiles I wanted? This is what I got.
 |
| Black granite was NOT my first choice. |
Don’t worry. The Liquid Nails was not on the counter for tile installation. This photo was of a dry fit for the tiles. Who knows why the Liquid Nails was out.
Anyway, yes, friends and neighbors, I got black granite instead of the cute little white tiles that I wanted. I am probably the only person in the world who thinks, “Dang. I can’t have ceramic, so I’ll have to just settle for granite.” No one ever said I was normal.
Aside (Told you I do this a lot)
The back story on the tile is that on a quick trip to Lowe’s, I discovered a pallet of black granite 12” tiles on sale. I tried not to look. I really did. But I knew Mr. Vagabond wanted granite. He’d only resigned himself to the white ceramic because I’m the one who would install it, and he is the one who would pay for it. That’s kinda how things go around here. I called him, told him the price, which was stunningly less per sq. ft. than the ceramic, and he jumped for joy. That part is a lie. He rarely “jumps”, and it’s less often that he “joys.” Suffice to say he was happy. I loaded up the cart. For $200, including the cost of thinset and black grout, I tiled my kitchen counters with granite. I had leftover Hardiebackder from the shower, so I didn't need more.
Now tell me, where do you find granite counters for $200? My house; that's where!
Since I have to rent a wet saw if I need one, and cutting granite requires special bits and blades, I decided I’d work on clever placement and not cut a single tile. This took a bit of plotting, but it worked out.
 |
I decided to break up some of the leftover slate from the shower and use it as a mosaic around the sink and along the back of the countertop. I later decided against it, and went with wood inserts instead.
And now comes the part I am most proud of in this kitchen. My island / bar. Because we had so many leftover cabinets, I couldn’t justify spending the cash for a big wood table in the center of the room. It wouldn’t have looked right anyhow, since the kitchen’s theme had turned a dizzyingly-fast 180. While Mr. Vagabond was working somewhere in Kentucky, I built this all by my own little self.
 |
| Words can't explain how I love this thing. |
The bottom is two base cabinets fastened together. I fabricated a countertop for it like the ones we made for the rest of the cabinets. The back side is where it got interesting. I wanted an area where we could sit and take casual meals. I built up the back and installed triangular supports for the bar top. Do the legs look like anything you know? They’re 4x4 fence posts turned upside down. My brain is always working overtime with regard to unusual applications for everyday things.
I added a little wood flourish and stained it to match the cabinets. Because I couldn’t cut the granite, I used a 1x4 for the island backsplash. Painted black, it blends.
Now comes the really fun part (I know I keep saying that)
Because we didn’t order these cabinets, we had to work with what we had. Ordering cabinets means that they will fit the dimensions of your room. We didn’t have that luxury.
But I am nothing if not resourceful.
Unfortunately, we could not make the upper cabinet configuration work in the the corner no matter what we did. Doors collided, gaps appeared and we said a lot of bad words (sorry,Mom). That lasted most of the weekend. We went through a lot of tequila in the process.
That Sunday night, I asked Mr. Vagabond to build me a platform in the corner that was the same size as one particular upper cabinet. He looked at me suspiciously, but that’s nothing new. He does that a lot.
I later learned that when he left for yet another in his lifelong series of road trips, he just knew he’d come home to something out of a Dr. Seuss nightmare.
 |
Instead, he came home to this.
|
Yeah, he was surprised, too. I hate that little door at the bread cubby in the corner. I was not prepared for the density of the cherry, and my cuts went haywire. I built and hung the little door as a temporary solution.
Finally!
As you can see, my kitchen has come a long way. A slight miscalculation when buying the slate for the shower led to a lot of excess, which I turned into the kitchen backsplash and a tall panel behind the stove.
 |
| One of these things is not like the others... |
In a fit of defiance over the modern cherry, I kept the original sink cabinet and built new doors for it. Off-white paint made it stand out even more. Some folks like it, others think it looks wonky. I love it, and think it breaks up the too-clean, modern lines of other cabinets. I still need new knobs and pulls, but the ones I want are going to cost a small fortune.
 |
| Sinner, gazing at her pretty self in the shiny, black plank floor. |
 |
After realizing the slate mosaic around the sink was a really bad idea, I installed strips of pine and stained them to complement the cabinets. I sealed the daylights out of it with silicone, and there have been no problems after several years of heavy abuse.
 |
| This is the corner of the kitchen that leads to a bath and the living room. The cubby exists where the old doorway was. I moved it. I do things like that. |
Whatever you do, remember that it is your kitchen. No one has to like it but you! As long as the materials and installation are up to code, let your freak flag fly and make it however you want it to be.
This house is an ongoing project. We never pay full price for anything except tools, and those are worth it. Never, ever, ever buy a knock-off tool because it’s cheaper. You’ll thank yourself a thousand times over the years for forking over the dough for the right tool for the job.
In the book I am writing, I have devoted an entire chapter to selecting the right tools. Don’t let me catch you buying one of those matchy-matchy pink hand tool sets. They’re designed to break upon first use, and have no business in your tool box. Trust me on this. The right tools are a worthy investment.
Patience is really important for living the way we do and renovating on a meager budget. We (meaning I) only installed a real floor in the living room last month, and we’ve been here five years! Until then, it was plywood painted white. That was a nightmare to clean, lemme tell ya. But as this blog goes, that’s another story for another day.
Be well, be happy and be thankful.
XO

I'm pretty sure you're the ultimate wife. Other than mine, of course. ;)
ReplyDeleteNice kitchen, too! :P
Adam
LOL! Thanks, Adam!
ReplyDeleteWelcome, sis. ;)
ReplyDeleteAdam
I want this kitchen.
ReplyDeleteAmazing! I'm totally hiring you when I buy a house.
ReplyDeleteAnd then kidnapping you.
Sweet! Can we invite Rex Goliath? ;-)
ReplyDeleteThat was some transformation! I say you really did a pretty good job with the restoration and renovations! Maybe Mr. Vagabond is right. You really have magic powers! Haha. Kidding aside, your kitchen looks great. It looks much better and nicer than the previous design. It looks simple and elegant. What I like the most is the island/bar you installed in the middle. It divides the space strategically, and it is a perfect place for mixing your favorite drinks and concoctions.
ReplyDeleteThank you! It's a labor of love that probably will never end. :-)
DeleteOut with the old, in with the new! ^^, Your kitchen looks beautiful, Carolee. You’ve really made a huge transformation over there. You must’ve exerted so much effort for you to come up with this. Nevertheless, I’m sure you had fun and you’re very happy with this awesome result. Good job!
ReplyDeleteThanks! And I am, except that now I'm bored with it again. I think within the next year, I'm going to redo the whole room! :-)
Delete